


WHIRLPOOL DRYER FRONT GLIDE KIT – 306508
$27.02
- Genuine OEM Quality: These parts are manufactured by the same company that made your appliance, ensuring compatibility and performance.
- Perfect Fit: OEM parts are designed to fit your specific appliance model perfectly, reducing the need for modifications or adjustments.
- Optimal Performance: OEM parts deliver the same level of performance and efficiency as the original components, maintaining your appliance’s functionality.
Available on backorder
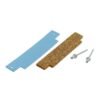
The 306508 Whirlpool Dryer Front Glide Kit is the perfect replacement part for your broken or worn-out dryer. This complete kit includes two slides and a clip that is specifically designed to replace the front of a Whirlpool dryer. It’s easy to install and will have your dryer operating like new in no time. Additionally, the material used is durable, ensuring you get the quality you deserve from your dryer. Installing the 306508 kit will provide the necessary support for your door to ensure it opens and closes properly. With this reliable replacement kit, you can be sure your Whirlpool dryer will be up and running in top condition. We’re your #1 source for genuine OEM appliance parts. Contact us for further questions as well as any other appliance parts needs! DIY: Replacing the 306508 Whirlpool Dryer Front Glide Kit
Tools Needed:
-Small flathead screwdriver
-Needle-nose pliers
-5/16” nut driver
-Measuring tape
-New 306508 Whirlpool Dryer Front Glide Kit
Instructions:
1. Unplug your dryer from the wall outlet.
2. Pull out your dryer and place it on a flat surface in an area where you can easily access all sides of the dryer.
3. Remove the top panel of the dryer. There should be two screws holding it on. Using a small flathead screwdriver, remove the screws.
4. Remove the drum from the dryer by unscrewing the two 5/16” nuts from the rear of the dryer using the nut driver.
5. Measure the length and width of the existing glide kit. Make sure to get the exact measurements so you know what size kit to purchase.
6. Purchase the new 306508 Whirlpool Dryer Front Glide Kit.
7. Disconnect any wiring connected to the old glide kit. Using needle-nose pliers, remove the old glide kit and set aside.
8. Connect the wiring to the new glide kit.
9. Lay the new glide kit into place. Make sure that the angle of the glide kit matches the angle of the old one.
10. Using the 5/16” nut driver, replace the two screws to secure the new glide kit into place.
11. Put the drum back into the dryer. Secure it with the two 5/16” nuts.
12. Replace the top panel and secure the screws.
13. Plug the power cord into the wall outlet.
14. Test the dryer to make sure everything is working properly.
Your dryer should now have a new 306508 Whirlpool Dryer Front Glide Kit!
Please keep in mind, these instructions are for general guidance and should always be used in conjunction with the manufacturer’s manual, if available. Search CDE4205AYJ CDE4205AYW CDE4205AZJ CDE4205AZW CDG4205AWJ CDG4205AWW DE106 DE107 DE18CA DE18CM DE18CS DE18CT DE19CA DE19CD DE19CS DE19CT DE212 DE23CD DE24CA DE24CM DE24CS DE24CT DE25CS DE26CA DE26CD DE26CS DE26CT DE27CA DE27CS DE27CT DE303 DE308 DE309 DE312 DE313 DE382 DE4000 DE408 DE409 DE412 1 2 3 4 5
Only logged in customers who have purchased this product may leave a review.
Related products


Reviews
There are no reviews yet.